Moisture Barrier Installation – When and How Guide
Protecting your home from water damage and mold growth starts with effective moisture barrier installation. Knowing how to correctly use vapor barriers when building a house is very important, particularly with Class I barriers. This guide will explain when to put up these important barriers, the different types you can use, and a step-by-step process to make sure they are installed safely and securely. Invest in your home’s longevity and safeguard it against moisture-related issues.
Key Takeaways:
Contents
What is a Moisture Barrier?

A moisture barrier, often referred to as a vapor barrier, is a material that resists the passage of moisture through walls, ceilings, and floors, rated according to its permeability.
The effectiveness of moisture barriers is classified into three permeability ratings:
-
6-mil polyethylene sheets block moisture effectively, making them ideal for basements.
-
Class II barriers, like certain spray-on coatings, allow slight moisture vapor to pass and are used in more breathable applications.
-
Class III barriers, such as house wraps, provide moderate permeability and are suitable for exterior wall assemblies.
When choosing a moisture barrier, think about your particular surroundings and building materials to achieve the best moisture control.
Importance of Moisture Barriers
Moisture barriers are important for controlling moisture, greatly lowering the chance of mold developing and improving energy use in homes.
By preventing water infiltration, moisture barriers can reduce mold-related issues by up to 80%, according to the Environmental Protection Agency. Homes with effective moisture management techniques experience energy savings of approximately 10-20% due to decreased humidity levels.
To meet building code requirements, think about using materials such as polyethylene sheets or spray-on membranes. Regular inspections to check for wear and tear on these barriers can further protect your investment and maintain indoor air quality, which is essential for a healthy living environment.
Types of Moisture Barriers
There are different moisture barriers available, each meant for particular building requirements and conditions.
Plastic Sheeting
Plastic sheeting, commonly made from polyethylene, serves as a Class I moisture barrier, effectively limiting water vapor transmission in crawl spaces and basements.
A key benefit is that it’s budget-friendly; standard rolls usually cost between $0.10 and $0.30 per square foot, which makes it a cost-effective option for covering large spaces.
Setting it up is easy. You usually just need a few simple tools, such as scissors and a utility knife. Typical uses are:
- building gardens and parks
- lining ponds
- shielding wood structures from water damage
Covering the ground with plastic sheeting prevents moisture from reaching your home, which stops mold growth and helps your home stay in good condition for a longer time.
Foil Barriers
Foil barriers block moisture and reflect heat, improving the building’s ability to resist temperature changes.
These barriers are particularly effective in climates where both moisture and heat gain are concerns.
For instance, in a basement application, installing a foil barrier directly on the interior walls creates an effective moisture shield while reflecting heat back into the living space, reducing heating costs.
In attics, foil barriers can be combined with traditional insulation materials, as they provide an additional layer of thermal protection without adding significant bulk.
This makes setup easier and saves energy, often making them a preferred choice.
Spray-On Barriers
Spray-on moisture barriers form an unbroken layer that prevents water from passing through, making them ideal for surfaces with complex shapes.
These barriers are especially beneficial in areas like bathrooms and basements, where traditional flashing may be challenging to install.
Products like 3M’s Fortify and LIQUID NAILS offer excellent adhesion and flexibility.
For the best results, make sure surfaces are clean and dry before you start. Use a sprayer that can be adjusted to get into small areas.
Applying multiple thin layers strengthens the barrier, forming a durable seal that prevents moisture and reduces damage over time.
When to Install a Moisture Barrier
Choosing the best time to put in a moisture barrier is key for getting the most out of its ability to control moisture.
New Construction
In new construction projects, putting in a moisture barrier is essential for meeting building codes and maintaining energy efficiency.
Using polyethylene sheeting is a common method for moisture barriers, often required by codes like the International Building Code (IBC) in specific areas.
Local regulations may dictate installing barriers in basements or crawl spaces. Beyond compliance, these barriers protect framing and insulation from mold and rot, enhancing long-term durability.
Homeowners benefit from improved indoor air quality and reduced heating and cooling costs. Therefore, consult the IBC or local codes to determine specific requirements for your project.
Renovations and Retrofits

Installing moisture barriers during renovations and retrofits can significantly reduce existing moisture-related problems in older buildings.
To assess your structure for moisture issues, start by inspecting areas prone to dampness, such as basements and crawl spaces. Look for signs like peeling paint and mildew.
Use moisture meters to get exact readings.
When selecting moisture barriers, consider options like polyethylene sheeting or spray-on membranes, depending on your budget and space constraints.
Polyethylene offers a cost-effective solution for large areas, while spray-on barriers provide seamless coverage and ease of application in tight spots.
Prioritize installation in high-risk areas to safeguard the integrity of your renovation.
Specific Situations Requiring Barriers
Certain situations, such as crawl spaces and basements, often require specific moisture barrier solutions to prevent water damage.
For crawl spaces, a polyethylene vapor barrier with at least 6-mil thickness is ideal; it should cover the entire ground and be sealed with tape at seams.
In basements, consider applying a liquid waterproofing membrane, like Drylok or RadonSeal, on walls to repel moisture. Make sure to clean the surfaces before applying and allow enough time for them to dry properly.
Maintain airflow through vents or dehumidifiers to regulate humidity levels effectively. Adjusting your method to fit the area will greatly improve defense against water damage.
Preparing for Installation
Getting ready properly is key for successful moisture barrier setup and lasting results. Implement this by following the methodology in our technical guide to Flooring Underlayment Installation where types and methods are detailed.
Assessing the Area
Checking the area for moisture issues is important to find the right moisture barrier to use.
Start your evaluation by looking for specific signs of moisture intrusion. Check for discoloration on walls, which can indicate mold growth, and note any damp odors in the space.
Next, inspect potential water entry points, such as windows and foundation joints. Make sure that gutters and downspouts are in good condition and working properly.
Check the humidity in walls and floors accurately with a moisture meter. This complete method will help you find the best moisture barrier for effective protection.
Gathering Necessary Materials
Gathering the right materials and tools is essential for a successful moisture barrier installation.
Start by procuring a high-quality moisture barrier, such as polyethylene sheeting, which is available in various thicknesses; a 6-mil option is commonly used. You’ll also need a staple gun for securing the barrier, tape for seams, and a utility knife for cutting.
Consider using a moisture meter to check the ground moisture levels before laying the barrier. This preparation guarantees a complete setup, reducing the risk of water damage later on.
Safety Precautions
It’s important to follow safety steps when installing a moisture barrier to prevent health problems from mold and other dangerous materials.
To stay safe while installing, wear safety gear such as gloves, goggles, and a mask to guard against particles in the air.
When handling hazardous materials, follow safety data sheets (SDS) for proper handling procedures and disposal methods. Make sure to provide fresh air in the workspace by opening windows or using fans.
Consider using moisture meters to check for dampness before you begin; this step can prevent mold growth after installation. Perform a safety checklist before starting work to identify and mitigate any potential hazards.
Installation Process
Putting in a moisture barrier requires doing several steps with care to make sure it works properly.
Moisture Barrier Installation Data
Moisture Barrier Installation Data
Installation Guidelines: Barrier Specifications
Installation Guidelines: PERM-A-BARRIER VPL Properties
The Moisture Barrier Installation Data provides critical specifications and properties for effective moisture barrier installation, highlighting key performance metrics essential for ensuring structural integrity and energy efficiency in buildings. Knowing these details is important for architects, builders, and contractors to meet construction rules and improve the lifespan of buildings.
Barrier Specifications include crucial metrics such as the Permeance Rating of 0.01, which indicates the material’s ability to restrict moisture vapor passage. A low permeance rating is ideal for preventing moisture intrusion, a critical factor in maintaining dry and healthy building interiors. The Minimum Tensile Strength of 45.0 demonstrates the barrier’s ability to withstand tension, ensuring durability under various stress conditions. Additionally, an Impact Puncture Resistance of 2200.0 Shows the material’s strength against physical harm, emphasizing its ability to withstand tough conditions.
The PERM-A-BARRIER VPL Properties describe thorough features beginning with a VOC Content of 30.0, reflecting low environmental impact and adherence to green building standards. The product’s Thickness in both Wet Film at 44.0 and Dry Film at 25.0 makes sure that there is enough coverage and good results after use. With a Solids Content by Volume of 59%, the barrier provides substantial protective material upon drying, enhancing its effectiveness.
- The Air Permeance of 0.0001 Shows strong protection against air leaks, important for saving energy and controlling indoor temperature.
- Water Vapor Transmission rated at 20.0 stops moisture from getting in, which is important to stop mold and damage to the structure.
- The Pull Adhesion to Concrete of 100.0 Keeps surfaces sticking well, lowering the chance of them coming apart over time.
- With a Tensile Strength of 110.0 and an Elongation capacity of 250.0, the barrier provides flexibility and strength, accommodating building movements without compromising integrity.
The installation data shows a thorough method for handling moisture, highlighting the need to choose strong materials to protect buildings from environmental issues. Each specification highlights the balance between physical durability, environmental compatibility, and effectiveness in moisture and air control, essential for modern construction solutions.
Step 1: Surface Preparation
Preparing the surface is the initial and key step in setting up a moisture barrier, ensuring it is applied evenly and functions effectively.
Begin by clearing the area of any debris, dust, or existing flooring materials. Use a broom and vacuum to achieve a clean surface.
It’s essential to level the ground; employ a self-leveling compound if necessary, particularly for uneven areas. Once leveled, allow the surface to dry completely, ideally using a moisture meter for accuracy.
Tools required for this preparation include:
- a broom
- a vacuum
- a trowel for leveling compounds
- a moisture meter
This careful preparation makes sure the moisture barrier sticks properly and works well.
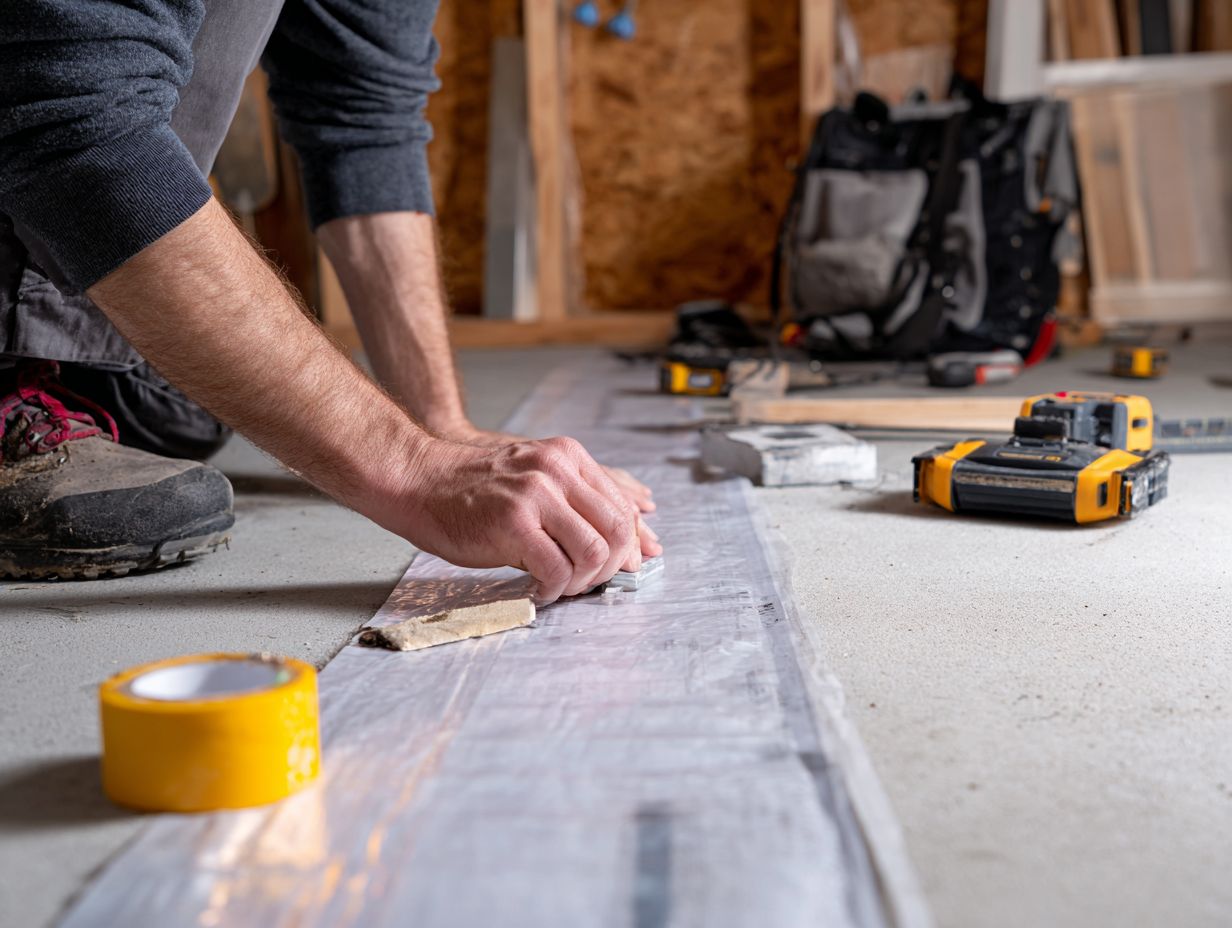
Step 2: Laying the Barrier
Putting the moisture barrier in place correctly makes sure it works well to stop moisture from getting in.
- Start by selecting the appropriate moisture barrier material-typically polyethylene sheeting or foil-faced insulation. Position the barrier directly on the ground or beneath flooring systems, ensuring it extends up the foundation walls.
- Overlap seams by at least 12 inches, and use waterproof tape to secure these overlaps tightly. At corners and around obstacles, trim the material to fit snugly, ensuring no gaps remain.
- Inspect the entire installation for any holes or tears before finishing your project; this will maximize the effectiveness of your moisture barrier.
Step 3: Sealing and Overlapping
Sealing seams and overlapping joints are critical to maintaining the integrity of the moisture barrier during installation.
To effectively seal seams, use a high-quality tape specifically designed for moisture barriers, such as Tyvek Tape or 3M All Weather Flashing Tape.
- First, clean the surface to make the tape stick well.
- Then, apply the tape evenly over the joint, overlapping edges by at least 2 inches.
Consider using liquid sealants like Henry Tropi-Cool for tricky areas or gaps, as they can create a seamless and flexible barrier.
Proper sealing keeps out moisture and improves energy efficiency in the building.
Step 4: Final Inspection
Checking the moisture barrier one more time ensures everything is installed correctly and functions properly.
- Begin by checking for any visible gaps or punctures in the barrier material, as these can compromise its effectiveness.
- Make sure seams are closed properly with a good sealant made for blocking moisture.
- Next, assess the installation of drainage systems; they should direct water away from the barrier without obstruction.
- Validate that the landscaping slants away from the structure to prevent water pooling.
- Use a moisture meter to check important spots and make sure the area stays dry behind the barrier.
Maintenance of Moisture Barriers
Regular upkeep of moisture barriers is needed to keep them working well over time.
Regular Inspections
Regular inspections help identify and address moisture-related issues before they escalate into major problems.
To properly handle moisture barriers, set up a routine to check them twice a year.
During each inspection, check for visible cracks, mold growth, and water stains. Use a moisture meter to test the barrier’s effectiveness; aim for readings below 20% moisture content. Tools like a thermal imaging camera can detect hidden leaks.
Keep a checklist to document findings, noting repairs needed and areas requiring immediate attention. For the best results, inspect your property yourself often and hire a professional to check for any moisture issues every two years.
Signs of Damage

Being able to recognize the signs of damage in moisture barriers can prevent costly repairs and health issues related to mold growth.
Common signs include peeling paint, visible mold, a musty odor, and increased humidity levels indoors. If you notice these issues, it’s important to respond immediately.
Start by inspecting vulnerable areas like basements and crawl spaces for leaks. Use a moisture meter to check humidity levels; readings above 60% suggest a problem.
To remediate, seal cracks with waterproof sealant and consider dehumidifiers to control moisture. Regularly inspect and clean gutters and drainage systems to avoid damage later.
Common Mistakes to Avoid
Avoid common mistakes when setting up a moisture barrier to make sure it functions properly for a long time.
Improper Sealing Techniques
Improper sealing techniques can lead to significant moisture ingress, undermining the barrier’s effectiveness.
To achieve a strong seal, begin by cleaning the surfaces well to get rid of dirt and dust.
Apply a high-quality sealant, such as silicone caulk, which adheres well and remains flexible over time.
To apply caulk in corners correctly, use a caulking gun.
Check for common pitfalls like insufficient sealant or missing sections-always backtrack and inspect your work.
Buying items such as a caulk smoothing tool or a moisture meter can help you get a professional-looking finish and reduce the chance of moisture problems later on.
Frequently Asked Questions
What is a moisture barrier?
A moisture barrier is a material used to prevent moisture from penetrating through surfaces, such as walls and floors, and causing damage.
When is the best time to install a moisture barrier?
The best time to install a moisture barrier is during the construction or renovation process, before any finishing materials are added.
Why is it important to install a moisture barrier?
Installing a moisture barrier helps prevent water damage, mold growth, and other issues caused by excess moisture.
How do I know if I need a moisture barrier?
If you live in a humid climate or have experienced moisture issues in the past, it is recommended to install a moisture barrier as a preventive measure.
What materials are commonly used for moisture barriers?
Common materials used for moisture barriers include plastic sheeting, tar paper, and specialized moisture barrier membranes.
Can I install a moisture barrier myself?
While it is possible to install a moisture barrier yourself, it is recommended to hire a professional contractor who has experience and knowledge in proper installation techniques.
While it is possible to install a moisture barrier yourself, it is recommended to hire a professional contractor who has experience and knowledge in proper installation techniques.