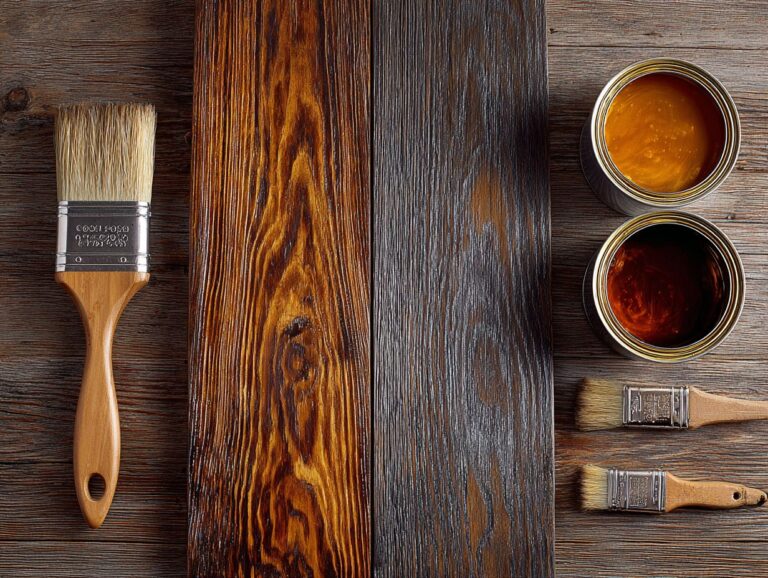
Stain Color Selection – Testing and Application
Picking the right wood stain can change the look of your project, but with choices like oil-based stain, water-based stain, and gel stain, it can feel confusing. Brands like Violet, Old Masters, and Rubio Monocoat provide a wide range of choices to examine. This guide will show you how to pick the right stain color, test it, and apply it so your wood stains look just right. Improve your woodworking skills by making better decisions!
Key Takeaways:
Contents
- Wood Stain Market Statistics in the U.S.
- Factors Influencing Stain Color Selection
- Testing Stain Colors
- Application Techniques for Stains
- Common Mistakes in Stain Application
- Finalizing Your Stain Choice
- Resources for Further Learning
- Frequently Asked Questions
- What factors should I consider when selecting a stain color for my project?
- How can I test a stain color before applying it to my entire project?
- What is the best way to apply a stain color to wood?
- How many coats of stain should I apply to achieve my desired color?
- Can I mix different stain colors to create a custom shade?
- What should I do if I am unhappy with the stain color I chose for my project?
Importance of Color Selection

Color selection directly impacts the perception of wood grain and texture, enhancing the beauty of wood while ensuring compatibility with design goals.
Choosing the right color can dramatically alter how wood appears in a space. Tools like color wheels help visualize how different shades interact with wood tones.
For example, pairing a deep walnut stain with subtle blue accents can highlight grain patterns effectively. Companies such as Old Masters offer online tools where users can test various wood stain colors on digital samples. This helps them see how the stains will look before they choose one.
This way, you make sure the chosen color fits your design idea and highlights the natural look of the material.
Overview of Stain Types
Different stain types offer unique properties: oil-based stains provide deep penetration, while water-based and gel stains offer quick drying and easy cleanup.
Oil-based stains, like Minwax, can deeply penetrate wood, enhancing its natural grain but require longer drying times and solvents for cleanup.
Water-based stains like Behr Premium dry within a few hours. They can be washed off with soap and water, which makes them user-friendly.
Gel stains, like General Finishes, work well on vertical surfaces due to their thicker consistency, minimizing drips.
When choosing a stain, consider your project requirements:
- For durable outdoor pieces, opt for oil-based.
- While indoor projects might benefit more from the ease of water-based types.
Wood Stain Market Statistics in the U.S.
Wood Stain Market Statistics in the U.S.
Revenue and Market Growth: Revenue Growth
The Wood Stain Market Statistics in the U.S. gives a detailed review of revenue increases, regional market changes, product types, and application areas, providing useful information about the market’s direction and makeup.
Revenue and Market Growth data show a significant upward trend in market value. Starting with a 2023 revenue of $2.3 billion, the market is projected to grow to $2.4 billion in 2024 and further expand to $4.9 billion by 2034. This growth represents a compound annual growth rate (CAGR) of 7.5% from 2024 to 2034, which shows strong demand and growth chances in the wood stain market, driven by more home renovations and the popularity of DIY projects.
- Regional Market Share 2024: The Mid-West U.S. leads with a market share of 42.8%. The dominance of this region, along with the combined 81.5% share of the top three U.S. regions, suggests that regional preferences and climatic conditions significantly influence wood stain usage. Manufacturers might find it beneficial to tailor their marketing and product strategies to these high-demand areas.
- Product Type Market Share: Oil-based wood stains, generating $628.5 million in 2024 and capturing 26.1% of the market, continue to hold substantial market value. Despite environmental concerns over volatile organic compounds (VOCs), their durability and finish quality maintain their demand, highlighting a balance between performance and eco-friendliness in consumer choices.
The Exterior Application Market Share 2023 reveals an overwhelming preference for exterior wood stains, accounting for $2 billion and 88.3% of the market. The need to shield outdoor wood from the weather is a major reason for using stain.
Overall, the data from the Wood Stain Market Statistics in the U.S. illustrates a growing and diversifying market. Industry participants should concentrate on creating new products, local marketing tactics, and eco-friendly methods to take advantage of the strong growth trend and address changing consumer needs.
Factors Influencing Stain Color Selection
Several key factors affect the choice of stain color, such as the kind of wood, surroundings, and personal preference. For a deeper understanding of the latest trends, consider exploring the Hardwood Flooring Color Trends 2025, which highlights the popular stains and tones that influence these choices.
Wood Species and Grain Patterns

The type of wood affects how stain colors look, as woods such as cherry, birch, and maple have unique grain patterns and absorb stain differently.
For example, cherry tends to darken significantly with clear finishes, while birch may absorb stain more evenly, resulting in a less dramatic color change.
To get the color you want, it’s a good idea to try out different wood pieces from each type. Use the same type of stain applied in identical conditions to compare the outcomes.
This method allows you to see firsthand how the wood accepts the color, letting you choose the best match for your project ahead of time.
Environmental Considerations
Environmental impact and application context necessitate careful selection of stain types, especially for outdoor projects exposed to moisture and UV light.
Choosing the right stain for outdoor projects requires more than aesthetics. Opt for oil-based stains, which typically offer superior weather resistance and longevity compared to water-based solutions.
Brands like Behr Premium or Cabot’s Australian Timber Oil are excellent for outdoor decks due to their UV protection and water repellency.
For indoor applications, consider products with low volatile organic compounds (VOCs) like Benjamin Moore’s Arborcoat, promoting healthier air quality.
Always follow specific product recommendations based on your environment, ensuring durable results that minimize environmental impact.
Desired Aesthetic and Style
Personal style and the desired aesthetic of a project guide stain selection, dictating whether you lean towards modern, rustic, or traditional finishes.
To align your stain choices with your overall design theme, begin by creating a mood board. Use tools like Canva or Pinterest to gather images that reflect your vision, including colors, textures, and furniture styles.
For instance, if aiming for a rustic look, consider warm, earthy tones like walnut or chestnut. In contrast, a modern aesthetic often benefits from lighter finishes such as ash or maple, which can make spaces feel larger and airier.
Visualizing your design with software like SketchUp can also help clarify how different stains will interact in the space.
Testing Stain Colors
Trying out stain colors on sample boards helps you choose the right match for your project.
Preparing Sample Boards
To choose stain colors, make sample boards with the same wood to see true results.
- Start by selecting uniform wood samples, ideally cut to 12×12 inches, to maintain consistency in your tests.
- If your wood is particularly porous, consider applying a wood conditioner to prevent the stain from absorbing unevenly.
- Once conditioned, apply the stain in thin, even coats. Allow each coat to dry fully before adding another layer to correctly see the color depth.
- This careful method lets you see how various stains work with the same wood, giving you dependable results for your choice.
Applying Stain Samples
When applying stains on sample boards, use the same method intended for the final application. This will let you correctly evaluate the color and texture in real-world settings.
To achieve the best results, start by using the same tools you plan to apply on the final project-whether it’s a brush, foam applicator, or cloth.
Experiment with applying different coats; typically, one coat will dry with a lighter hue, while two or more will deepen the color. Test these variations on a sample piece of wood, noting how the stain interacts with the grain.
This careful approach allows you to fine-tune the application technique and achieve consistent outcomes for your actual project.
Evaluating Color Under Different Lighting
Evaluating stain colors under various lighting conditions reveals how colors change, which is essential for ensuring satisfaction with the final result.
To fully grasp how each color looks, begin by testing them under three kinds of lighting: natural, fluorescent, and incandescent.
Set up swatches in different locations-one near a window, one under a bright fluorescent bulb, and one near a lamp with incandescent bulbs. Take detailed photos in each environment to document how the stains differ.
This approach helps improve memory and aids in making smart decisions about how colors work with the design at various times of the day.
Application Techniques for Stains
Knowing how to correctly apply finishes is important to give stained wood a polished look and make your wood projects more durable.
Tools and Materials Needed

Having the right tools and materials helps you apply stain smoothly and achieve a great finish on your wood projects.
- To start, gather essential tools like high-quality brushes (Purdy or Wooster for about $10-$15 each) for even application, clean rags (lint-free) for wiping excess stain, and DuroGrit sanding pads ($12 for a pack) to prepare the surface.
- Pre-stain conditioners, such as Minwax ($8), help prevent blotchiness in soft woods. Allocate around $50-$75 for materials, depending on the size of your project.
- By putting these tools together, you’ll make the staining process easier and better.
Application Methods: Brush vs. Spray
Choosing between brush and spray methods can significantly affect the finish quality and efficiency when staining wood.
Brushing provides accuracy, which is perfect for detailed work or smaller tasks. For example, a natural bristle brush is ideal for applying oil-based stains, allowing you to control each stroke.
Alternatively, spraying is faster and covers larger areas more uniformly. A product like the Graco Ultra Max II is excellent for outdoor projects where speed is essential. It requires more setup and can overspray if not handled properly.
Evaluate your project’s size and detail to select the best method, as this will impact both the appearance and time investment.
Layering Techniques for Depth
Using multiple layers can add more depth and variety to stain colors, resulting in a more interesting and attractive finish.
To achieve optimal results, begin with a base coat of a semi-transparent stain, such as Minwax Wood Finish or Behr Premium. Allow this layer to dry for at least 4-6 hours.
Next, apply a second coat, mixing in a contrasting color, which can deepen the hue and add complexity. Drying times are important; wait for each layer to completely dry before adding another one, which may require a full day based on the humidity level.
To make the finish more durable and shiny, apply a clear coat after the last stain.
Common Mistakes in Stain Application
Steering clear of typical errors when applying stain can save time and result in a nice finish, improving the final look of your work.
Inconsistent Application
Inconsistent application can lead to uneven color distribution, ruining the aesthetic of your stained project.
To achieve a uniform finish, start by selecting the right tools. Use a high-quality brush or foam applicator, as these allow for better control and coverage.
Apply the stain in manageable sections, about 3 feet at a time, to prevent it from drying too quickly. Consistently brush in the same direction along the grain of the wood, and don’t overload the applicator to avoid drips.
For faster results, products like Fast Dry Stain can help you complete the job well and make sure the application is smooth.
Ignoring Grain Direction
Ignoring the grain direction during application results in a blotchy appearance, undermining the natural beauty of the wood.
To achieve a flawless finish, always apply your stain along the wood grain, ensuring even absorption. Apply a wood conditioner before staining to get consistent color and avoid blotches, especially on soft woods like pine.
Before working on your project, test your stain on a scrap piece of wood to visualize the effect and adjust your technique accordingly. This first step can save time and resources, helping you improve your method before working on the final surface.
Finalizing Your Stain Choice
Picking your stain involves adjusting after testing it and preparing to preserve it for a long period.
Making Adjustments Based on Testing
Trying out samples can help you choose the right stain, making sure the final result is what you expect.
Start by testing various Rubio Monocoat stains on scrap wood, applying generously and allowing them to dry. Observe the colors at different lighting conditions to see how they shift.
Take notes on the mixtures tried; for instance, combining a Walnut and Ash can produce a rich, warm tone. After settling on a preferred mix, apply it to a larger area to confirm consistency.
Be prepared for slight adjustments in ratios for the best match. This practical method makes sure your completed project matches your personal style choices.
Sealing and Protecting the Stained Surface

Protecting the stained surface is important to prevent damage from weather, helping your project to last longer.
To achieve optimal sealing, consider using polyurethane or varnish. Polyurethane provides a durable finish and is available in both water-based and oil-based options.
Water-based polyurethane dries in roughly two hours and provides a clear finish, which works well for lighter woods. Oil-based polyurethane, on the other hand, takes longer to dry-around 6-8 hours-but provides a richer color.
Before starting, make sure the surface is clean and smooth. Use a brush or foam applicator to apply thin layers. Wait about 24 hours for each layer to dry completely for the best outcome.
Recap of Key Considerations
Important things to think about when choosing a stain color are knowing the type of wood, trying out colors, and learning how to apply them properly.
When selecting a stain color, start by identifying your wood species, as each type reacts differently to stains. For example, oak often brings out deep colors, while maple can look darker.
Try out the stain on leftover wood pieces to see how the color changes once it is applied and dried. To apply effectively, use a high-quality brush or foam applicator for even coverage, and consider using a pre-stain conditioner for soft woods to prevent blotchiness.
Remember, lighting conditions in your space can drastically change how the stain looks, so observe it in various lights.
Encouragement for Experimentation
Trying out various stains and methods can create one-of-a-kind and custom finishes, improving your woodworking projects.
Consider starting with a few common stains, such as walnut, oak, and cherry. For each, try varying application methods-brushing, wiping, or spraying-to observe how texture changes the final look.
Write down your methods and color mixes; this will help you improve your skills as time goes on. Use tools such as foam brushes to get smooth finishes or rags for applications with more texture.
Accept mistakes as chances to learn, as they can lead to surprising and lovely results.
Resources for Further Learning
Learning more about wood stains can greatly improve your abilities and project results.
For more detailed information on staining techniques, check out these helpful resources:
- ‘The Complete Manual of Woodworking’ by Albert Jackson, which covers both basics and advanced methods.
- For a practical approach, check out the YouTube channel ‘Woodworking for Mere Mortals,’ featuring easy-to-follow tutorials on staining and finishing.
- Visit the website FineWoodworking.com for articles and forums where you can learn from experienced woodworkers and ask questions.
These tools will help you make informed decisions and improve your woodworking projects.
Frequently Asked Questions
What factors should I consider when selecting a stain color for my project?
When choosing a stain color, it’s important to consider the type of wood you are staining, the desired level of opacity, and the overall aesthetic you are trying to achieve. It can also be helpful to test out different stain colors on a small, inconspicuous area before committing to a larger application.
How can I test a stain color before applying it to my entire project?
Many hardware stores offer small samples of various stain colors that you can use on a small piece of your wood to see how it will look once applied. You can also purchase a test kit that includes multiple stain colors to try out.
What is the best way to apply a stain color to wood?
The most common methods for applying stain are brushing, wiping, or spraying. Each method has its own benefits and drawbacks, so it’s important to consider the type of wood and the desired outcome when choosing a method. It’s also important to follow the manufacturer’s instructions for the specific stain you are using.
How many coats of stain should I apply to achieve my desired color?
The number of coats needed varies depending on the type of wood and the opacity of the stain. In general, one or two coats should be enough to achieve a subtle color change, while three or more coats may be needed for a more dramatic change. Test a small area first to determine the appropriate number of coats for your project.
Can I mix different stain colors to create a custom shade?
Yes, you can mix different stain colors to create a custom shade. This can be a helpful way to achieve a specific color that may not be available as a pre-made stain. Be sure to mix the stains thoroughly and test out the color on a small area before applying it to your entire project.
What should I do if I am unhappy with the stain color I chose for my project?
If you are unsatisfied with the final result of your stain color, you may be able to remove it by sanding or using a chemical stripper. It’s always a good idea to test out a stain color on a small area before committing to a larger application to avoid any potential issues.